by Jen Stringfellow, Scenic Charge Artist
Creating the Textures of Tree Bark for "Red Riding Hood"
In this show-and-tell, Jen Stringfellow, South Coast Repertory's scenic charge artist, shares how her team created the realistic textures of tree bark found on the set of Red Riding Hood, a Theatre for Young Audiences Family show streaming from April 21-June 13.
First off, the birch trees were repurposed from last season’s Scarlet Letter—they never made it to stage because of the pandemic, but got a new chance to debut in Red Riding Hood. Set designer Shaun Motley was very excited about them. We eventually had to tone them warmer to be less spooky-looking. They were made by applying brown paper dipped in glue over large cardboard tubes, usually used for pouring concrete. We took larger tubes to make our maple trees, as Shaun didn’t want a forest of only birch trees.
Follow Stringfellow's process in the slides below.
- Photo 1: This is how we got the unit from the carpenters. The upper curved part was foam and the bottom part was cardboard tubing.
- Photo 2: We used brown paper on the larger trees, but on this smaller unit we used muslin. This is because it’s easier to get more movement (those linear gestures) across a smaller area with fabric. We dipped our muslin in a mixture of flexible white glue and Jaxsan (a flexible acrylic latex coating) and applied our fabric over the unit, pulling and pinching where we wanted texture.
- Photo 3: After the muslin step is dry, I mixed up a texture to apply over the fabric. Oftentimes, physical texture (think joint compound for example) will crack when you don’t want it too. I wanted it to crack for some “barkiness,” so I made sure to mix something up that would crack on me. For me this meant adding a lot of fumed silica to my mix.
- Photo 4: I put my first coat of paint on, and you can really see how the applied texture mixture cracked.
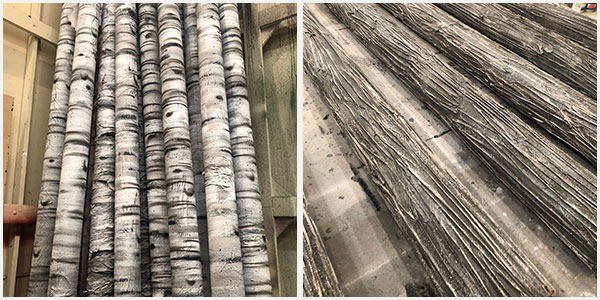
- Photo 5: When I’m painting over texture I usually start with the darkest color and work my way up. This way I can highlight all the raised bits of the texture I worked so hard to create. We “drybrush” by taking a dry brush and very little paint and lightly grazing over the top of the texture.
- Photo 6: This was our lightest drybrush step, to really bring out the peaks of the texture.
- Photo 7: To bring it all back together and add some warmth, we toned the whole unit down with a clear chocolatey glaze.
- Photo 8: Our Props Shop really brought this unit to life by adding vines and greenery!

About the author
South Coast Repertory
South Coast Repertory is a Tony Award-winning theatre is known for producing classics, contemporary hits and world premieres, for having the largest new-play development program in the nation and for advancing the art of theatre in service to the community.